Lesson 1 · The points and the bones of the hand
What you get at the end of this lesson
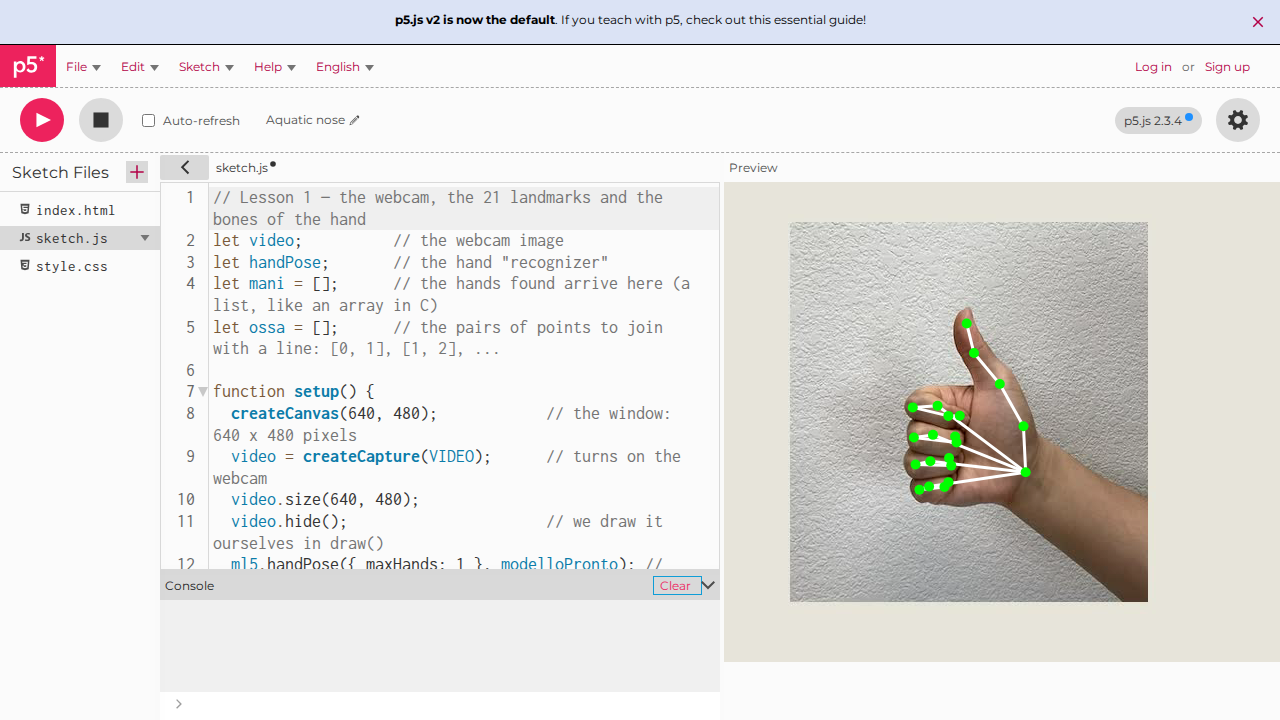
Your webcam on screen, with your hand drawn on top: 21 green dots (the points) joined by white lines (the bones). Move your hand and the drawing follows it; close your fingers and the drawing closes with them.
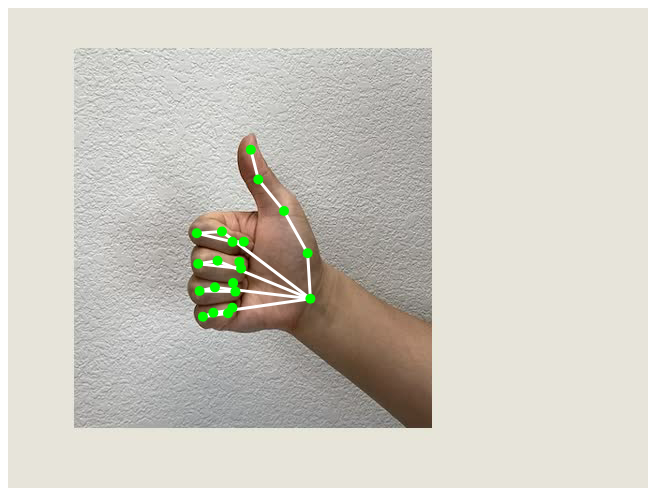
Time: 60 minutes · Lines of code: about 45 · You need: a PC with a webcam, Chrome or Edge, internet
There is only one program, and you build it in three steps:
- Get it running (15 min): you copy the code into the editor and see it work.
- Understand it (25 min): we read it one piece at a time, comparing it with the C you know.
- Change it (20 min): four exercises, each one changes something you see on screen.
To keep things simple the program looks for one hand only: if you show two, it draws one.
1. Get it running
Step 1 — Open the editor
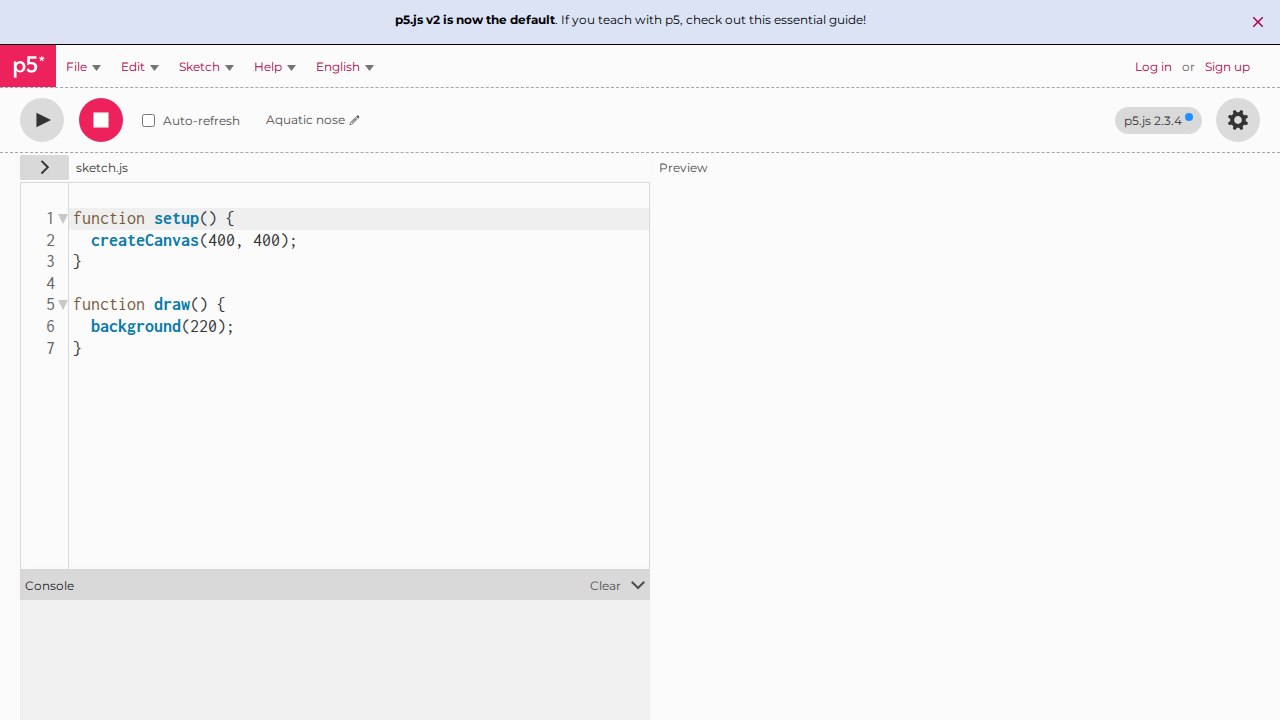
Go to https://editor.p5js.org/. The p5.js editor opens: the code on the left, the result on the right (empty for now). You do not need to sign up to try it.
Check
Do you see the round ▶ button at the top left and the sketch.js file with setup and draw
inside? You are in the right place.
Step 2 — Add the library that recognizes the hand
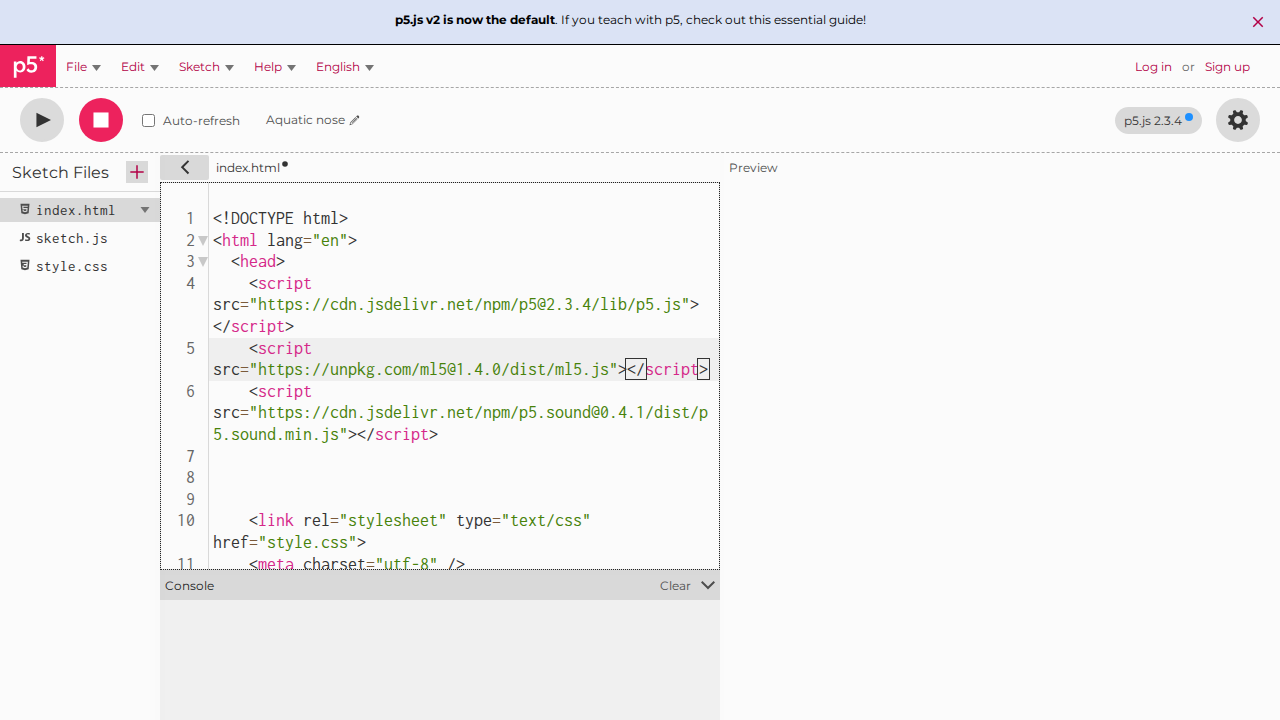
The project has several files. To see them, click the small arrow › at the top left, above the
code: the Sketch Files list appears. Click index.html.
Find the line that loads p5.js: it contains p5.js or p5.min.js and ends with </script>.
Put the cursor at the end of that line, after </script>, press Enter and type (or paste)
this new line:
<script src="https://unpkg.com/ml5@1.4.0/dist/ml5.js"></script>
Why
It is like an #include in C: without this line the program does not know what ml5 is.
p5.js is for drawing; ml5.js contains the artificial intelligence model that finds the
hand. The number 1.4.0 is the version: we pin it, so the code always works the same way.
Watch out
The new line goes after </script>, not in the middle. Long lines wrap by themselves in the
editor: look at the number on the left to see where a line really ends.
Step 3 — Paste the program
In the file list go back to sketch.js. Delete everything in it (Ctrl+A, then Delete) and
paste this program (the button at the top right of the box copies it):
// Lesson 1 — the webcam, the 21 landmarks and the bones of the hand
let video;          // the webcam image
let handPose;       // the hand "recognizer"
let mani = [];      // the hands found arrive here (a list, like an array in C)
let ossa = [];      // the pairs of points to join with a line: [0, 1], [1, 2], ...

function setup() {
  createCanvas(640, 480);            // the window: 640 x 480 pixels
  video = createCapture(VIDEO);      // turns on the webcam
  video.size(640, 480);
  video.hide();                      // we draw it ourselves in draw()
  ml5.handPose({ maxHands: 1 }, modelloPronto); // loads the model: look for ONE hand only
}

function modelloPronto(modello) {  // when it is ready, ml5 hands it to us here
  handPose = modello;
  ossa = handPose.getConnections();          // asks the model which points must be joined
  handPose.detectStart(video, maniTrovate);  // from now on it looks for the hand continuously
}

function maniTrovate(risultati) {
  mani = risultati;                  // every time it has finished, it saves what it found
}

function draw() {
  image(video, 0, 0);                // 1) draws the webcam image

  if (mani.length > 0) {             // 2) if it found the hand...
    let mano = mani[0];              //    ...the first (and only) one in the list

    stroke(255, 255, 255);           // 3) the bones: white lines
    strokeWeight(3);                 //    3 pixels thick
    for (let i = 0; i < ossa.length; i++) {
      let a = mano.keypoints[ossa[i][0]];  // the point where the bone starts
      let b = mano.keypoints[ossa[i][1]];  // the point where it ends
      line(a.x, a.y, b.x, b.y);
    }

    noStroke();                      // 4) the points: green dots, no outline
    fill(0, 255, 0);
    for (let j = 0; j < mano.keypoints.length; j++) {  // for each of the 21 points
      let punto = mano.keypoints[j];
      circle(punto.x, punto.y, 10);  // a 10-pixel dot
    }
  }
}
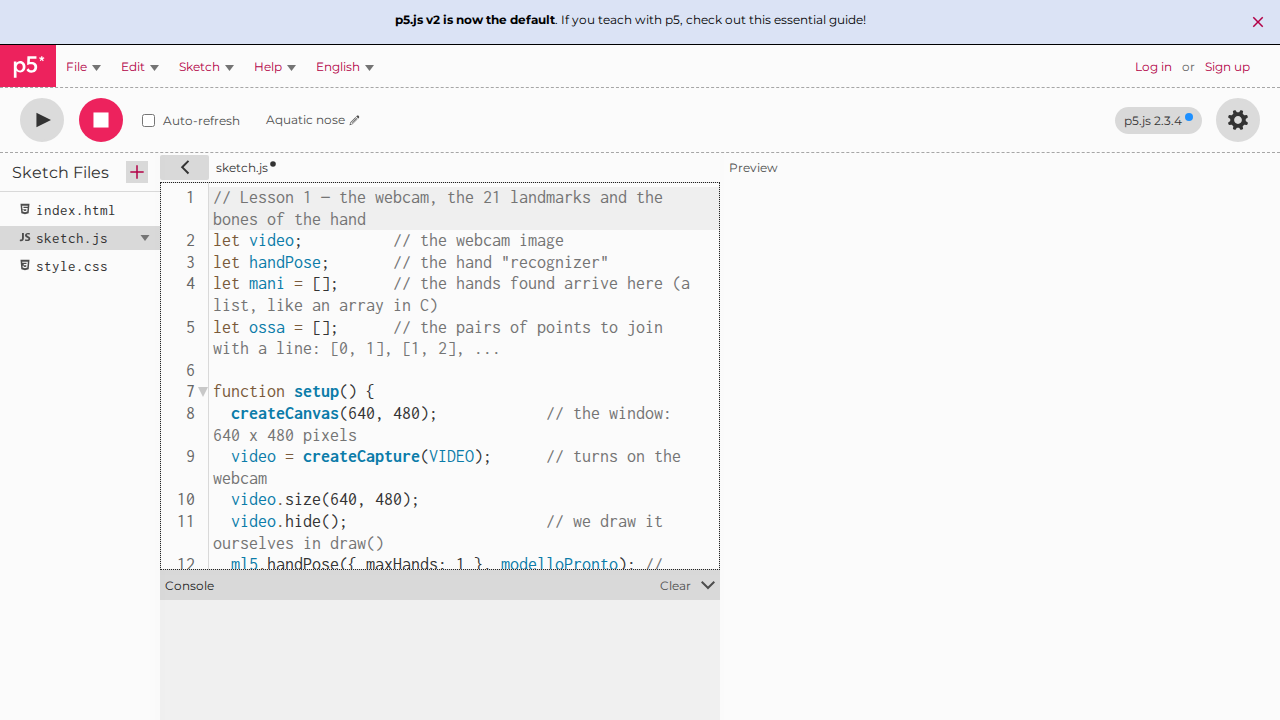
Step 4 — Press ▶
- Press ▶ (Play) at the top.
- The browser asks for permission to use the webcam: allow it.
-
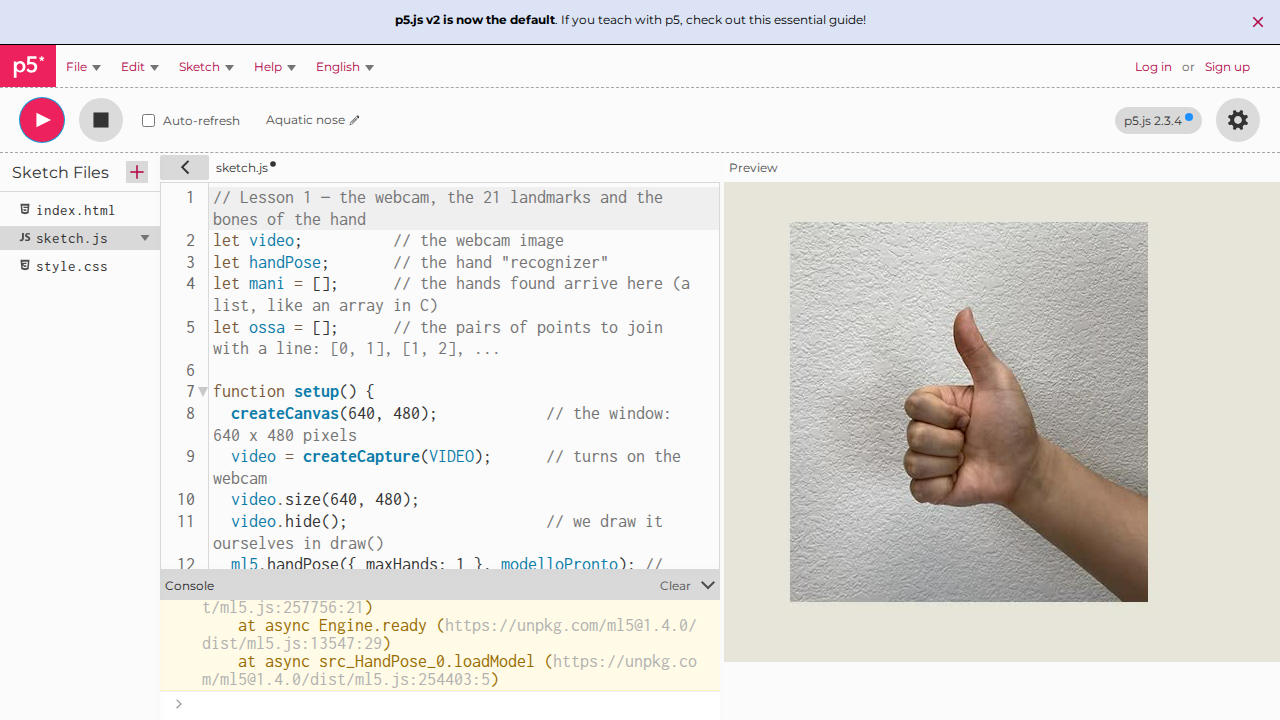
At first you only see the webcam image: the model is downloading, it takes a few seconds.
-
Put your hand in front of the webcam: the dots and the lines appear.
Check
Do you see the green dots and the white lines on your hand? The program works. If not, see If it does not work at the bottom of the page.
2. Understand it
From C to JavaScript: the five differences you need today
The program is written in JavaScript, the language of browsers. It is much closer to C than it looks:
| In C | In JavaScript | What changes |
|---|---|---|
int x = 5; |
let x = 5; |
You do not write the type: let works for numbers, text, arrays |
void disegna() { ... } |
function disegna() { ... } |
Instead of the return type you write function |
int v[21]; and you remember the length yourself |
let v = []; and v.length |
The array knows its length and can grow |
p.x on a struct |
punto.x on an object |
Same: you read a field with the dot |
The program starts from main() |
setup() and draw() start by themselves |
See below |
No main: setup() and draw()
With p5.js you do not write main. You write two functions, and p5.js calls them for you:
// it is as if p5.js had written this main for you:
int main() {
    setup();          // only once, at the start
    while (1) {
        draw();       // forever, about 60 times per second
    }
}
- In
setup()you prepare things: the window, the webcam, the recognizer. - In
draw()you draw one frame. Since it is called over and over, what you draw updates by itself: that is how the drawing follows the hand.
The variables at the top
let video;          // the webcam image
let handPose;       // the hand "recognizer"
let mani = [];      // the hands found arrive here
let ossa = [];      // the pairs of points to join with a line
They are global variables, like the ones written outside main in C: every function can see
them. mani (hands) and ossa (bones) start as empty arrays ([]): they fill up when the model
is ready.
setup(): everything is prepared, only once
| Line | What it does | Why |
|---|---|---|
createCanvas(640, 480); |
Creates the drawing window, 640 × 480 pixels | It is the sheet we draw on |
video = createCapture(VIDEO); |
Turns on the webcam | The images to look at come from here |
video.size(640, 480); |
Gives the video the same size as the window | So the points found land in the right place of the drawing |
video.hide(); |
Hides the "raw" video | We draw it ourselves in draw(), under the points |
ml5.handPose({ maxHands: 1 }, modelloPronto); |
Downloads the model that recognizes hands | maxHands: 1 means "look for at most one hand": the program is simpler and faster |
{ maxHands: 1 } is an object with a single field: it is like passing a small struct of
options. If one day you want two hands, just write 2.
The functions called «when it is ready»
There are two functions that nobody calls explicitly: modelloPronto (model ready) and
maniTrovate (hands found). We pass them by name to ml5, and ml5 calls them when it has
finished a job:
ml5.handPose(..., modelloPronto): «download the model and, when you are done, callmodelloPronto»;handPose.detectStart(video, maniTrovate): «watch the video continuously, and every time you have found the hand callmaniTrovatewith the results».
It is the same trick as function pointers in C: you pass a function as an argument, and someone else will call it at the right moment.
Inside modelloPronto there is also the new line for the bones:
ossa = handPose.getConnections(); // asks the model which points must be joined
The model already knows which points are connected (the wrist to the thumb, the knuckle to the
finger bone, …) and gives them to us as an array of pairs: [[0, 1], [1, 2], [2, 3], ...]. The
pair [0, 1] means «join point 0 with point 1». It is like an int ossa[N][2] matrix in C.
What is inside mani
mani is an array of hands: empty if there is no hand, with a single element when it finds one
(we asked for maxHands: 1). Each hand has a keypoints field, an array of 21 points; each
point has x and y, in pixels, like the window.
The points are always numbered the same way:
| Number | Where |
|---|---|
| 0 | the wrist |
| 1 – 4 | the thumb, from the base to the tip (4) |
| 5 – 8 | the index finger, from the knuckle to the tip (8) |
| 9 – 12 | the middle finger, tip 12 |
| 13 – 16 | the ring finger, tip 16 |
| 17 – 20 | the little finger, tip 20 |
So mano.keypoints[8].x is the x of the index fingertip. You will need this table in all the next
lessons.
draw(): one frame, in four moves
1) The webcam. image(video, 0, 0); draws the webcam image starting from the top left corner.
It must be drawn first: whatever you draw afterwards ends up on top.
2) Is there a hand?
if (mani.length > 0) {   // if it found the hand...
  let mano = mani[0];    // ...the first (and only) one in the list
If the array is empty there is nothing to draw. The check matters: reading mani[0] when mani
is empty would be like reading outside an array in C.
3) The bones.
stroke(255, 255, 255);   // line colour: white
strokeWeight(3);         // thickness: 3 pixels
for (let i = 0; i < ossa.length; i++) {
  let a = mano.keypoints[ossa[i][0]];  // the point where the bone starts
  let b = mano.keypoints[ossa[i][1]];  // the point where it ends
  line(a.x, a.y, b.x, b.y);            // a line from a to b
}
For each pair, we take the two points and draw a line from one to the other. ossa[i][0] is a
number (for example 5), and mano.keypoints[5] is the point with that number: one array used as
the index of another array, as you would do in C.
4) The points. With noStroke() we remove the outline, with fill(0, 255, 0) we choose green,
then a for loop draws a circle on each of the 21 points. The points come after the bones, so
they sit on top of the lines and are easy to see.
The p5.js drawing functions used today
| Function | What it does |
|---|---|
createCanvas(640, 480) |
Creates the drawing window, 640 × 480 pixels. The origin (0, 0) is at the top left, and y grows downwards |
image(video, 0, 0) |
Draws the webcam image, starting from the top left corner |
stroke(r, g, b) |
Chooses the colour of lines and outlines: red, green, blue, from 0 to 255 |
strokeWeight(n) |
Chooses the thickness of lines, in pixels |
line(x1, y1, x2, y2) |
A line from point (x1, y1) to point (x2, y2) |
fill(r, g, b) |
Chooses the fill colour |
noStroke() |
No outline around shapes |
circle(x, y, d) |
A circle with centre (x, y) and diameter d |
The image is not a mirror
If you raise your right hand, on screen you see it on the left, as in a photo. That is normal: for now it is perfectly fine.
3. Change it
Do the exercises in order. After each change press ▶ and check that what you expected happened on screen.
Exercise 1 — Red, bigger dots
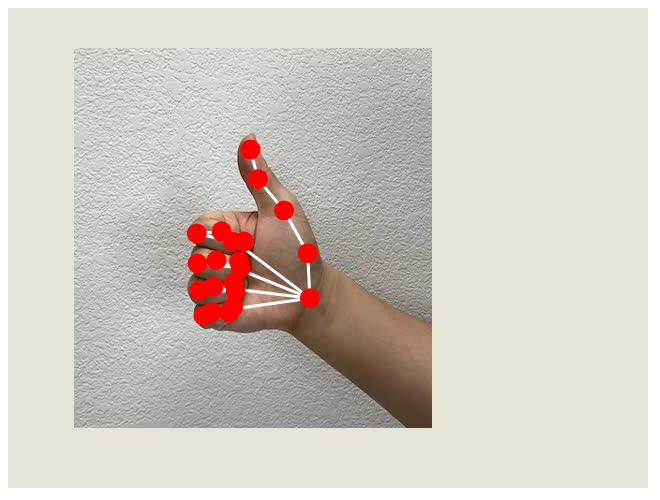
Result: the dots become red and twice as big.
Solution
In the 4) the points part, change the colour and the diameter:
fill(255, 0, 0);               // red
circle(punto.x, punto.y, 20);  // diameter 20 instead of 10
Exercise 2 — Coloured bones
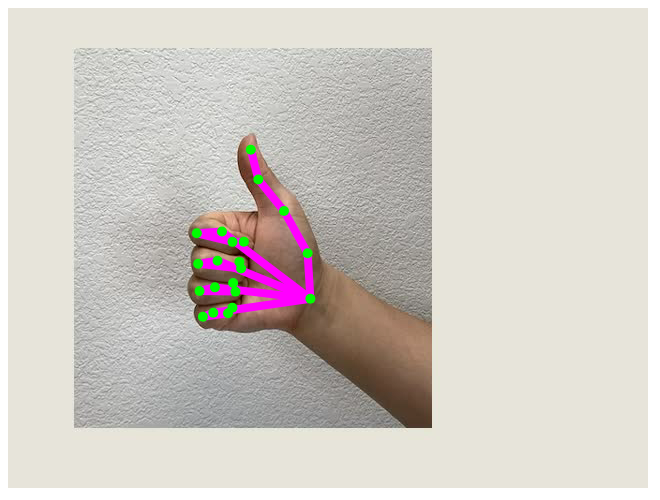
Result: the lines become purple and much thicker.
Hint: stroke chooses the colour of the lines, strokeWeight their thickness.
Solution
In the 3) the bones part:
stroke(255, 0, 255);   // purple: red + blue
strokeWeight(8);       // 8 pixels instead of 3
Exercise 3 — Only the index fingertip
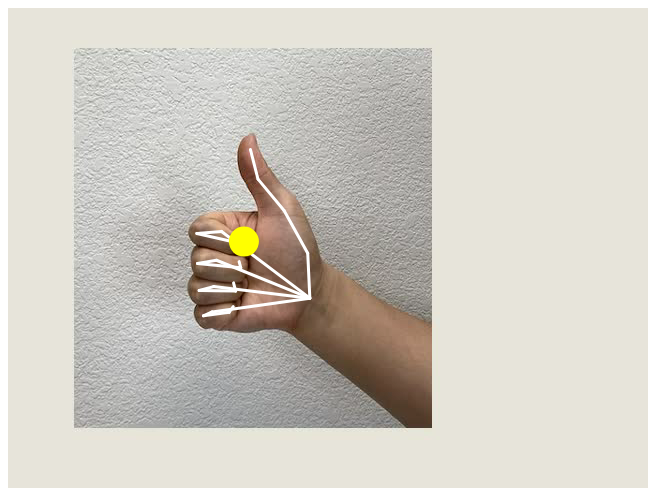
Result: instead of the 21 dots, only one dot remains, big and yellow, on the index fingertip. The bones stay.
Hint: the index fingertip is point number 8. You do not need the for loop of the points.
Solution
Instead of the for loop of the points (after noStroke();):
let punta = mano.keypoints[8];   // the index fingertip
fill(255, 255, 0);               // yellow
circle(punta.x, punta.y, 30);
Exercise 4 — Where is the finger?
Result: at the top left the coordinates of the index fingertip appear, for example
x = 312 y = 145, and they change as you move your finger.
Hint: text("hello", 20, 40) writes «hello» at position (20, 40); textSize(32) chooses the
size. In JavaScript texts are joined with +, and round() removes the decimals.
Solution
Below the yellow dot of exercise 3:
fill(0);                         // black: readable even on a light wall
textSize(32);
text("x = " + round(punta.x) + "   y = " + round(punta.y), 20, 40);
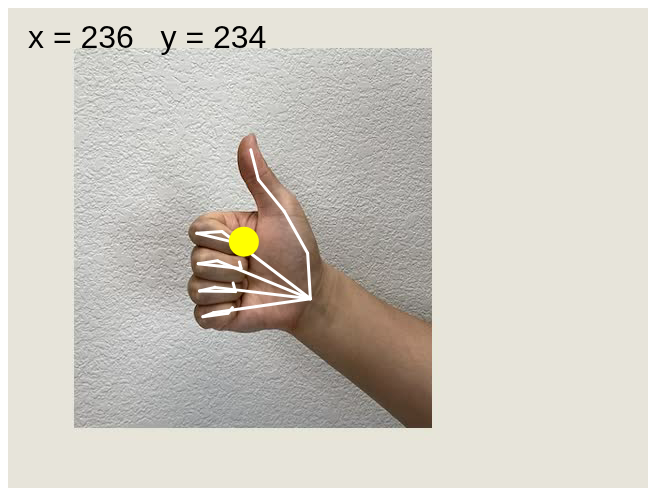
Try moving your finger upwards: y decreases. Remember this, you will need it in lesson 2 to tell whether a finger is raised.
If it does not work
| What you see | What to do |
|---|---|
| The right side stays empty, no webcam | The browser has no permission: click the webcam icon in the address bar and allow it, then press ▶ again |
| The webcam shows, but no dots | Wait 10–20 seconds: the first time the model is downloading. Then check that the hand is well lit and fully in the image |
Below the code it says ml5 is not defined |
The line from step 2 is missing in index.html, mistyped, or ended up in the middle of the p5.js line |
| Another red error below the code | You deleted or changed a piece by mistake: paste the program from step 3 again |
| You show two hands but only one is drawn | That is correct: the program looks for one hand only (maxHands: 1) |
The next lesson
Lesson 2 · How many fingers? At the end you will have on screen a big number telling how many
fingers you are raising, from 0 to 5. You will use one if per finger: is the tip higher than the
knuckle?